Search This Blog

Monday, September 19, 2011

IS and AS Keywords Introduced in AX2012

In Microsoft Dynamics AX2012, the X++ language provides the as and is expression operators to control downcast assignments. Downcast assignments involve class or table inheritance.

Assignment statements that implicitly downcast can cause errors that are hard for the programmer to predict or diagnose.

 You can use the as keyword to make your downcasts explicit.
You can use the is keyword to test whether a downcast is valid at run time.
as Example
static void AsTestJob33(Args _args)
{
    
    BaseClass basec; 
    DerivedClass derivedc;

    BottomClass bottomc; ;

    derivedc = new DerivedClass();

    basec = derivedc;

    derivedc = basec as DerivedClass;

    bottomc = new BottomClass();
    bottomc = basec as DerivedClass;
}

is Example

static void IsKeywordJob46(Args _args) 
{
    DerivedClass derivedc;
    BaseClass basec;

    basec = new DerivedClass();  // An upcast.
    if (basec IS DerivedClass)
    {
        info("Test 1: (basec IS DerivedClass) is true. Good.");
        derivedc = basec AS DerivedClass;
    }

    basec = new BaseClass();
    if (!(basec IS DerivedClass))
    {
        info("Test 2: (!(basec IS DerivedClass) is true. Good."));
    }
}

AX 2012 TempDB Tables

In Microsoft Dynamics AX, one type of temporary table is a TempDB table.

We call them TempDB tables because their TableType property value is TempDB. This value comes from the TableType::TempDB enum value. The TableType property value can be set at AOT > Data Dictionary > Tables > MyTempDBTable > Properties > TableType.

Only processes that run on the server tier can instantiate TempDB tables.

Following Sample will give the little picture about how to use the TempDb Tables

Create the Class with this main method and Run the class
server public static void main(Args _args)
{
    MyTempdb MyTempdb;
    CustTable custTable;
    TableType tableTypeEnum;
    str stringWork;
    ;
   
    info("Start of main.");
    MyTempdb;.AccountNum = "4004";
    MyTempdb;.doInsert();
    MyTempdb;.AccountNum = "4005";
    MyTempdb;.doInsert();
    tableTypeEnum = MyTempdb;.getTableType();
    stringWork = "MyTempdb.TableType is: " + enum2Str(tableTypeEnum);
    info(stringWork);
    while select *
            from custTable
                JOIN MyTempdb;
            where
                MyTempdb;.AccountNum == custTable.AccountNum
    {
        stringWork = custTable.AccountNum
                + " , "
                + int2Str(custTable.MandatoryCreditLimit);
        info(stringWork);
    }
}

BP Deviation Update for AOT while Upgrading

Following job is used to update the methods with the BP Deviation documented while upgrading from one version to another version.
This job is used to update for tables,Classes,Views,FormMethods,ReportMethods.

This wont update at the datasource for forms or reports level.

static void krishh_AddBPDeviationDocumented(Args _args)
{
    TreeNode            node;

    TreeNode            childNode;
    TreeNodeIterator    nodeIt;
    FilePath            path;
    str filter,filter1;
    str BPFix='//BP Deviation Documented';
    str firstLine;
    List listSource=new List(Types::String);
    ListIterator listIterator;
    str BPFixFind='//BP Deviation Documented*';

    ;

    filter='*display*';
    filter1='*edit*';

    path        = @'\Data dictionary\tables\CustTable';
   // path        = @'\Data dictionary\views\CustTable';
    //path=@'\Classes';
    //path=@\Forms';
    path += '\\Methods';

    node        = TreeNode::findNode(path);
    nodeIt      = node.AOTiterator();

    childNode   = nodeIt.next();
    if(childNode.AOTLayer()==UtilEntryLevel::var)
    {
        while(childNode)
        {
            listSource=Global::strSplit(childNode.AOTgetSource(),'()');
            listIterator=new listIterator(listSource);
            if(listIterator.more())
            {
               if(firstLine like BPFixFind)
               {
                   info(strFmt('Table.Method:%1.%2 is already BP Deviated',childNode.AOTparent(),childNode.AOTname()));
               }
               else
                {
                  if((firstLine like filter) || (firstLine like filter1))
                    {
                        childNode.AOTsetSource(BPFix+"\n"+ childNode.AOTgetSource());
                        childNode.AOTcompile();
                        childNode.AOTsave();
                    }
                }
            }
            childNode = nodeIt.next();
        }
    }
}

Excute Query using X++

static void krishh_RunQueryFormusingCode(Args _args)
{
    QueryRun    SalesQuotationUpdate;
    SalesQuotationTable SalesQuotationTable;
    ;
    SalesQuotationUpdate = new QueryRun(QueryStr(SalesQuotationUpdate));
    if (SalesQuotationUpdate.prompt())
    {
        while (SalesQuotationUpdate.next())
        {
            if (SalesQuotationUpdate.changed(tablenum(SalesQuotationTable)))
            {
                SalesQuotationTable = SalesQuotationUpdate.get(
                    tablenum(SalesQuotationTable));
                info(SalesQuotationTable.QuotationId);
            }
        }
    }
}

Expressions in QueryRanges

static void krishh_ExpressionInQuery(Args _args)
{
    Query q = new Query(); 
    QueryRun qr;
    CustTable ct;
    QueryBuildDataSource qbr1;
    ;
    qbr1 = q.addDataSource(tablenum(CustTable));
    qbr1.name("Customer");
    qbr1.addRange(fieldNum(CustTable, AccountNum)).value(
    strFmt('((%1.%2 == "4000") || (%1.%3 == "The Bulb"))',
        qbr1.name(),
        fieldStr(CustTable, AccountNum),
        fieldStr(CustTable, Name)));
       info(qbr1.toString());
    qr = new QueryRun(q);
    while (qr.next())
    {
        if (qr.changedNo(1))
        {
            ct = qr.getNo(1);
            info(strfmt('CustomerAccountNum=%1 And Customer Name=%2',ct.AccountNum,ct.Name));
        }
    }
}

Friday, September 16, 2011

AX2012 QueryFilter Class

The following X++ code example uses the QueryFilter class to filter the result set from an outer join.

The QrySalesAndLines query joins the parent and child tables on an equality test between parent's primary key field and child's foreign key field. The following job adds another join filter criteria which tests whether the Quantity field equals 66.

static void krishh_QueryFilter(Args _args)
{
    Query query2;
    QueryBuildDataSource qbDataSource3;
    QueryRun queryRun4;
    // Ax2012 class
    QueryFilter qFilter7;
    SalesOrder recSalesOrder;
    SalesOrderLine recSalesOrderLine;
    struct struct5;
    struct5 = new struct
        ("int SalesOrderID;"
        + "date DateAdded;"
        + "str SalesOrderLineID;"
        + "int Quantity"
        );
    query2 = new Query("QrySalesAndLines");
    qbDataSource3 = query2.dataSourceName("SalesOrderLine_1");
    qFilter7 = query2.addQueryFilter(qbDataSource3, "Quantity");
    qFilter7.value("66");
    queryRun4 = new QueryRun(query2);
    while (queryRun4.next())
    {
        recSalesOrder = queryRun4.getNo(1);
        recSalesOrderLine = queryRun4.getNo(2);
        struct5.value("SalesOrderID", recSalesOrder.SalesOrderID);
        struct5.value("DateAdded", recSalesOrder.DateAdded);
        struct5.value("SalesOrderLineID", recSalesOrderLine.SalesOrderLineID);
        struct5.value("Quantity", recSalesOrderLine.Quantity);
        info(struct5.toString());
    }
}

Execute External DB Query using X++


static void krishh_ExecuteExternalDBQuery()
{
    LoginProperty loginProperty;
    OdbcConnection odbcConnection;
    Statement statement;
    ResultSet resultSet;
    str sql, criteria;
    SqlStatementExecutePermission perm;
    ;
    // Set the information on the ODBC.
    loginProperty = new LoginProperty();
    loginProperty.setDSN("dsnName");
    loginProperty.setDatabase("databaseName");
    //Create a connection to external database.
    odbcConnection = new OdbcConnection(loginProperty);
    if (odbcConnection)
    {
        sql = "SELECT * FROM MYTABLE WHERE FIELD = "
            + criteria
            + " ORDER BY FIELD1, FIELD2 ASC ;";
        //Assert permission for executing the sql string.
        perm = new SqlStatementExecutePermission(sql);
        perm.assert();
        //Prepare the sql statement.
        statement = odbcConnection.createStatement();
        resultSet = statement.executeQuery(sql);
        //Cause the sql statement to run,
        //then loop through each row in the result.
        while (resultSet.next())
        {
            //It is not possible to get field 3 and then 1.
            //Always get fields in numerical order, such as 1 then 2 the 3 etc.
            print resultSet.getString(1);
            print resultSet.getString(3);
        }
        //Close the connection.
        resultSet.close();
        statement.close();
    }
    else
    {
        error("Failed to log on to the database through ODBC.");
    }
}

ADD Query to AOT using X++

Sample X++ code used to Add the Query to AOT.
static void Krishh_addQueryToAOTUsingX++(Args _args)
{
    TreeNode                treeNode;
    Query                   query;
    QueryBuildDataSource    qbds;
    QueryBuildRange         qbr;
    str                     queryName = "MyQuery";
    #AOT
    ;
    treeNode = TreeNode::findNode(#QueriesPath);
    query = treeNode.AOTfindChild(queryName);
    if (!query)
    {
        treeNode.AOTadd(queryName);
        query = treeNode.AOTfindChild(queryName);
        qbds  = query.addDataSource(tablenum(Address));
        qbr   = qbds.addRange(fieldnum(Address,Name));
        query.AOTcompile(1);
        query.AOTsave();
    }
}

Tuesday, September 13, 2011

AX2012 Compiler Window Changes Explained

Following diagaram explains the Compiler window changes.

Ax2012 Meta Model

What is new in the meta model for AX 2012? Quite a lot – here is a short summary:
  • SSRS Report is added, it will replace Reporting Library and Report.
    Create an SSRS Report for any reporting needs.
  • Parts are introduced: Info Part, Form Part, Cue and Cue Group.
    These all provides additional information that can be hosted on a form. An Info Part provides a simple grid, a Form Part can host a form inside a form, a Cue provides visual KPIs.
  • Service and Service Group Provides capabilities for exposing X++ classes as .NET services – wsdl style.
  • New security concepts: Role, Duty, Privilege, Security Policy, Code Permission and Process Cycle. These are all part of the new role based security framework. Notice the meta model contains Role – allowing the developer to specify predefined roles.
  • Security key is deprecated
  • Visual Studio Project is added
    You can now have VS projects (like C# and VB) in the meta model – yes, they support layer based customization and rapid deployment like all other meta model concepts.
  • …. and much more
 The diagram below shows the most common relationships between concepts. Each arrow should be read as “using”. For example:
  • Menu uses Menu Item. A menu has a collection menu items.
  • Menu Item uses Form. A menu item references a form. This form is launched when the user clicks the menu item.
  • Form uses Table. A form uses a table as a data source.
  • Table uses Extended Data Type. The fields on a table is defined using extended data types. 
Provided the below diagram, and pinned it to a wall in my office. It serves me as a reference when I navigate the new areas of AX 2012. I hope it can do the same for you.

Changes to the Collection Classes in Dynamics AX 2012

In Microsoft Dynamics AX 2012 we introduced the ability to compile X++ code into .NET Framework CIL.
We intend for X++ code to produce the same results whether it is interpreted or run as CIL. We therefore had to make some minor changes to legacy X++ behavior.

This post explains the change to the legacy behavior of the X++ interpreter in the area of the AX collection classes, which include the Map, Set, List, and Array classes.

1. Type Checking to Ensure Match

The first X++ interpreter change is an increase in the type matching checks for the AX collection classes.  In most cases, the value inserted into a collection should have the same or compatible type as the defined type of the collection classes.

For example-
Define a list with type being string, but try to insert a different type:

    List l = new List(Types::String);
        l.addFront(1);

 Here an exception will be raised and the following text will be shown in the info log

The expected type was str, but the encountered type was int.
Ax2012 introduced this new restriction in X++ because type mismatches are not allowed in CIL.

NOTE: Due to legacy code issues of type mismatching in Maps, this check has been temporarily disabled for Maps in the X++ interpreter. This type check is enabled for the other collections (namely Set, List, and Array).

2. Disallow Null Values

The second change is that null values are no longer allowed as elements in Sets, or as keys in Maps.  Sets and Maps in .NET Framework have this same restriction. 

For example:
static void krishh_NullValidation(Args _args)
{
 
   Map m;
 
   Set s;
 
   Query q;

     ;
 
   m = new Map(Types::Class,Types::String);
 
   m.insert(q, "abc");  //q is null which is not instantiated so an exception is raised.

 
   s = new Set(Types::Class);
 
   s.add(q);  //q is null so an exception is raised.
 }

3. Invalidate Enumerators/Iterators After Changing Elements
The third change is to invalidate enumerators and iterators of a Map or Set object if any element of the collection is added or removed after the enumerator/iterator is created. 

Consider the following code, where a map is initialized with a few elements.
static void Job2(Args _args)
{
    Map m;
    MapIterator it;
    str s;
 
    m = new Map(types::Integer,Types::String);
    it = new MapIterator(m);  //The map iterator is constructed.

    m.insert(1, "abc");
    m.insert(2, "def");
    m.insert(4, "ghi");
    m.remove(2);  //Contents of map are modified.
 
   it.begin(); 
//This access of the iterator raises an exception.


}

An exception will be raised with the following message:
The iterator does not designate a valid element.

A map can be modified by MapIterator.delete() as well, and this will also cause the iterator to be invalid after the delete(). 

For example:
static void Job3(Args _args)
{
    Map m;
    MapIterator it;
 
    m = new Map(types::Integer,Types::String);
          it = new MapIterator(m);  //The map iterator is constructed.
 
   m.insert(1, "abc");
    m.insert(2, "def");
    m.insert(4, "ghi");
         it.begin();         info(it.toString());
  
   it.delete();  //An element is deleted from the map.
    
   it.next();    
//The iterator is no longer valid, so an exception is raised.
 
      
info(it.toString());


}

How shall we handle legacy X++ code that removes elements from a Map using MapIterator?

One option is to iterate through the Map elements, and copy the key of each unwanted element into a Set.  Next iterate through the Set, and for element, delete its match from the Map.

For example:
static void Job4(Args _args)
{
    Map m;
    MapIterator it;
    Set s;
 
   SetEnumerator sm;

 
   m = new Map(types::Integer,Types::String); 
//Keys are of type Integer.
 
   m.insert(1, "abc");
    m.insert(2, "def");
    m.insert(4, "ghi");
 
   it = new MapIterator(m);
 
   s = new Set(Types::Integer); //This Set stores the type that matches the Map keys.
 
   it.begin();
 
   while(it.more()) //Iterate through the Map keys.
 
   {
 
       if(it.domainValue() mod 2 == 0)
 
           s.add(it.domainValue());  //Copy this unwanted key into the Set. 
 
       it.next();
 
   }


   sm = s.getEnumerator();
 
   while(sm.moveNext()) //Iterate through the Set.
 
   {
        m.remove(sm.current());  //Delete the key from the Map.

 
 }

}


Remaining Inconsistencies
Currently there remain two inconsistencies in AX collection behavior between (a) X++ by the interpreter versus (b) X++ as CIL. One involves deletions, the other insertions:

  1. Deletions:  Deleting from a Set by using SetIterator.delete() works fine when running X++ by the interpreter. Yet in X++ as CIL this deletion raises an exception saying the iterator is invalid.  We will fix this inconsistency in the near future.
  2. Insertions:  Inserting an item into a Map or Set that is currently being used by an enumerator or iterator works fine when running X++ by the interpreter. Yet in X++ as CIL the enumerator or iterator becomes invalid after the insertion and it raises an exception.
For #2 Insertions into a Map, the inconsistency is illustrated in the following example:
static void Job5(Args _args)
{
    Map m = new Map(types::String,Types::Integer);
    MapEnumerator me =  m.GetEnumerator();
     m.insert("1", 10);          info(m.toString());
   
  me.moveNext(); //This line causes different behavior between X++ interpreter versus CIL.
 
   info(me.toString());


This job run successfully in the interpreter gives results.

However, if we run the above job as CIL, then an exception is raised:
System.InvalidOperationException: Collection was modified after the enumerator was instantiated.
}
 

List All forms From AOT

Sample code lists all the forms from AOT

static void krishh_listAllForms(Args _args)
{
     #AOT
    TreeNode tNode;
    XInfo  xinfo=new XInfo();
    Counter    cntr;
    ;
    tNode=xinfo.findNode(#FormsPath);
    tNode=tnode.AOTFirstChild();
    while(tNode)
    {
         info(tNode.treeNodeName());
         tNode=tnode.AOTnextSibling();
         cntr++;
    }
}

AX2012 Certifications

Monday, September 12, 2011

Computed Column to a View in AX 2012

This post describes how you can add a computed column to a view in Microsoft Dynamics AX.
A computed column is the output of a computation that inputs a regular column.

For example, suppose your table has a column that is named AnnualRent. Your view could return a computed column that is named MonthlyRent and which calculates AnnualRent/12.

You can add the computed column to the select list of columns only. If the computed column is itself a select statement with a where clause, you can include the name of a real column in that where clause.

Create a View
In this section you create a view named TestCompColView.
  1. Click AOT > Data Dictionary > Views > New View.
  2. Right-click the new View1 node, and then click Properties.
  3. In the Properties window, change the Name property to TestCompColView.
  4. Expand the Views > TestCompColView > Metadata > Data Sources node.
  5. Open a second AOT window and drop the node AOT > Data Dictionary > Tables > CustTable onto the TestCompColView > Metadata > Data Sources node in the first AOT window.
  6. Expand the TestCompColView > Metadata > Data Sources > CustTable_1 > Fields node.
  7. In the other AOT window, expand the TestCompColView > Fields node.
  8. From under the TestCompColView > Metadata > Data Sources > CustTable_1 > Fields node, drop the AccountNum field onto the TestCompColView > Fields node of the other AOT. Also drop the SubsegmentId field in the same way.
  9. Click TestCompColView > Save.
Add a Static Method to the View
The technique to add a computed column begins with you adding a static method to the view. The method must return a string. The system automatically concatenates the returned string with other strings that the system generates to form an entire T-SQL create view statement.
 
The method that you add to the view typically has at least one call to the DictView.computedColumnString method. The parameters into the computedColumnString method include the name of a data source on the view, and one field name from that data source. The computedColumnString method returns the name of the field after qualifying the name with the alias of the associated table. For example, if the computedColumnString method is given the field name of AccountNum, it returns a string such as A.AccountNum or B.AccountNum.

Steps to add a method to a view

  1. Under AOT > Data Dictionary > Views, expand the node for your TestCompColView view that you created in the previous section.
  2. Under your view, click Methods > New Method. The method editor window is displayed.
  3. Change the method definition to the following:
    private static server str compColSubsegAcctMethod()
Code in the Body of the Method

private static server str compColSubsegAcctMethod()
{
    #define.ViewName(TestCompColView)
    #define.DataSourceName("CustTable_1")
    #define.FieldSubsegmentId("SubsegmentId")
    #define.FieldAccountNum("AccountNum")
    str sReturn,
        sAccountNum,
        sSubsegmentId;
    DictView dictView2;

    // Construct a DictView object for the present view.
    dictView2 = new DictView(tableNum(#ViewName));

    // Get a string that has the target field name
    // propertly qualified with an alias (such
    // as "A." or "B.").
    sAccountNum = dictView2.computedColumnString
        (#DataSourceName,
        #FieldAccountNum,
        FieldNameGenerationMode::FieldList,
        true);

    sSubsegmentId = dictView2.computedColumnString
        (#DataSourceName,
        #FieldSubsegmentId,
        FieldNameGenerationMode::FieldList,
        true);

    sReturn = "substring("
        + sSubsegmentId
        + ",1,1) + ' - ' + "
        + sAccountNum;

    // Helpful confirming or diagnostic information.
    info(sAccountNum);
    info(sSubsegmentId);
    info(sReturn);

    return sReturn;
}
Add a Computed Column to the View 
In this section you add a computed column to the view.
  1. Right-click the Fields node under your view, and then click String Computed Column.
  2. For the new field or column, change the Name property to compCol_Subseg_Acct.
  3. Change the StringSize property to 32.
Link the Computed Column to the Method
In this section you relate the computed column to the static method that you added in a previous section.
  1. For the computed column, you set the ViewMethod property to the name of the compColSubsegAcctMethod method that you wrote in a previous step.
See the Data in the Computed Column
 
The data that is generated for the computed column can be seen by using the AOT. Click AOT > Data Dictionary > Views > TestCompColView > Open.

Sample Data from the View

The following table displays sample data that includes the computed column.
SubsegmentId AccountNum CompCol_Subseg_Acct
Medium 4000 M - 4000
Gross 4001 G - 4001

Installation of Object ID's in AX2012

Installation-specific IDs What can you do? Microsoft Dynamics AX 2009 Microsoft Dynamics AX 2012 Why is this important?
Object IDs such as table IDs, field IDs, and class IDs are now installation specific. With this change, you no longer need to worry about conflicting object IDs in different installations. Objects IDs were assigned when a model element was created. When a new model element is saved, imported, or installed, a unique ID is assigned to the model element at that installation site.
For example, when a new class is added by a developer and saved to the model store, the class will be assigned a class ID. But when the same class is imported to another installation at a customer site, the class ID may be different to the ID assigned in the first installation site.
The new object IDs assigned for Microsoft Dynamics AX 2012 installations are greater than the previous object ID range and will not conflict with any of the earlier versions of Microsoft Dynamics AX.
In an upgrade scenario, object IDs are preserved because they are automatically assigned to the new LegacyId property on the application objects.
With installation-specific IDs, conflicts are avoided because an ID is not assigned until installation time.
Because the assignment of the object IDs is handled at the installation site, the Team Server is no longer required to manage IDs. Team Server is no longer installed, and version control setup is no longer dependent on Team Server

AX2012 Unit of Work

A record gets RecId value at the moment it is inserted into the database. What if we are doing bulk insert of a journal with many lines and the journal header contains some totals calculated based on its lines. It is impossible to insert lines before header since the value of the journal's surrogate key is unknown. But that would be so convenient because otherwise the header should be inserted first, then the lines and then the header should be updated with the calculated totals.

The answer is – use Unit of Work. It allows to perform create, update and delete operations without worrying about the order of those and without a need to specify surrogate key values. It will all be done automatically in the kernel

Let us do some sample-
Create the following Tables


After Creating the tables create a job for doing the insertion for the above tables using UnitOfWork.


Some more details about the unit of work feature:
All database operations happen only when unitofwork.saveChanges() method is invoked.
  1. UnitOfWork class has insertOnSaveChanges(), updateOnSaveChanges() and deleteOnSaveChanges() methods for CUD operations.
  2. Surrogate keys can be propagated automatically to related records if buffers are linked via navigation methods (AJournalLine.header() method in the example). Navigation methods can be created automatically from relations. I’ll write a separate post about them.
AX client has the great support of the unit of work as well.
This means that form datasources can be grouped into a unit of work.

Friday, September 9, 2011

AX2012 BOF (Business operation framework)

Business Operation Framework (BOF) [AX 2012]
The Business Operation Framework service is one of the system services exposed by Microsoft Dynamics AX and that adheres to the Windows Communication Foundation (WCF) protocols and standards.
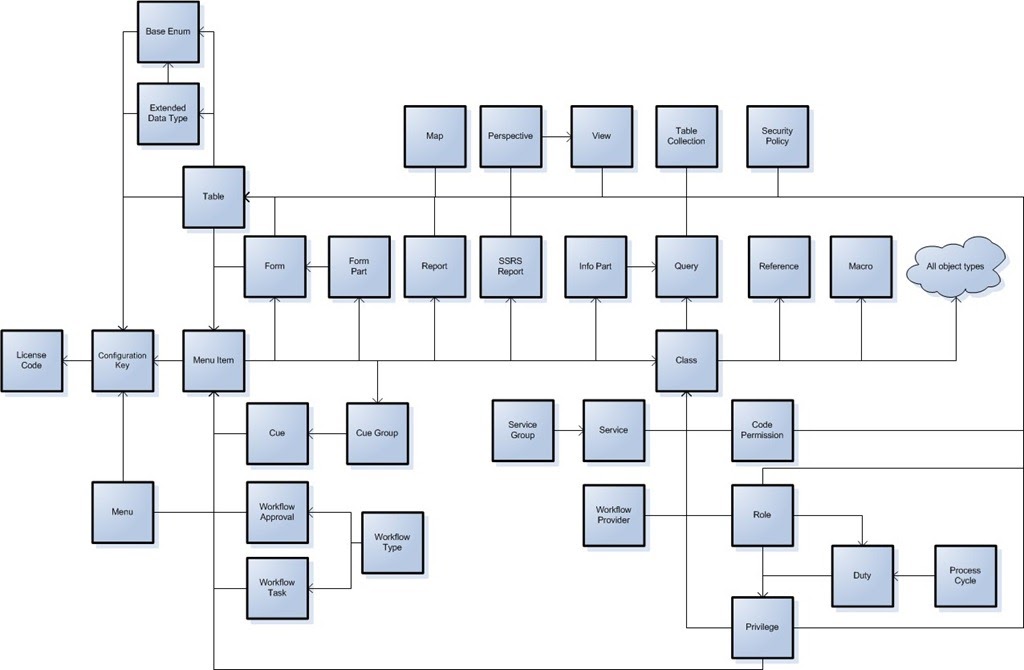
This service enables you to  develop the Service and attach that service to BOF

·         Allows menu-driven execution or batch execution of services.
·         Calls services in synchronous or asynchronous mode.
·         Automatically creates a customizable UI based on the data contract.
·         Encapsulates code to operate on the appropriate tier (prompting on the client tier, and business logic on the server tier).

SysOperationServiceController
ServiceClassName
SysOperationExecutionMode
Enums

Overview
To create a Business Operation Framework service, the following steps must be performed.
·         Create a data contract class
·         Identify the parameters passed to the service
·         Register the class as a Business Operation Framework service
·         Optionally customize the automatically generated UI for the class
Create a data contract class
Create one or more classes to define the parameters for the operation.
The X++ attribute [DataContractAttribute] identifies the class as a data contract class.

[DataContractAttribute]
class SimpleDataContract
{
    int property1;
    str property2;
}
Identify parameters
The X++ attribute [DataMemberAttribute] identifies the property accessor methods, which are the parameters to the service call.

[DataMemberAttribute]
public int property1(int _property1 = property1)
{
    property1 = _property1;
    return property1;
}

[DataMemberAttribute]
public str property2(str _property2 = property2)
{
    property2 = _property2;
    return property2;
}
The data contract class can have properties that return data contract classes for more complex scenarios.
Register service
After the data contract classes are defined, creating the service operation is simple.

class SimpleService
{
}

public str operation1(SimpleDataContract _dataContract)
{
    str returnValue;

    returnValue = strfmt('Input was %1, %2',
        _dataContract.property1(),
        _dataContract.property2());

    return returnValue;
}
To register this class as a service, the following steps must be performed.
1.       The class must be marked to run on the server.
2.       The class must be registered in Application::registerServices.

void registerServices()
{

    xApplication::addXppService(new DictClass(classnum(SimpleService)));
}

Generate and customize the UI for the class
When the Business Operation Framework service executes, the framework will automatically generate a UI for the operation by reflecting on the data contract class and building a dialog. No further work is required if the generated UI is adequate.
However, if you wish to modify the automatically generated UI, you can make those modifications two ways: Attribute-based customization and code-based customization.
Attribute-based UI customization
In most scenarios attribute based customization is sufficient.
To add a UI group for the parameters, add a SysOperationGroupAttribute to the DataContractAttribute:

[DataContractAttribute,
    SysOperationGroupAttribute('group1', "@SYS1001", '1')]
class SimpleDataContract
{
    int property1;
    str property2;
}
To order property2 before property1 within group1, and use labels on both properties:
[DataMemberAttribute,
    SysOperationGroupMemberAttribute('group1'),SysOperationLabelAttribute('SYS1002'),SysOperationHelpTextAttribute('SYS1003'),SysOperationDisplayOrderAttribute('2')]
public int property1(int _property1 = property1)
{
    property1 = _property1;
    return property1;
}

[DataMemberAttribute,
    SysOperationGroupMemberAttribute('group1'),SysOperationLabelAttribute('SYS3000'),SysOperationHelpTextAttribute('SYS301868'),SysOperationDisplayOrderAttribute('1')]
public str property2(str _property2 = property2)
{
    property2 = _property2;
    return property2;
}
Code-based UI customization
Note: I could not find information in the spec on code-based UI customization.
 
A Business Operation Framework service can be called in four ways:
As a menu item or as a batch process. And it can be called synchronously or asynchronously.
To call a Business Operation Framework service from a menu item
1.       Create an Action Menu Item
2.       Set the ObjectType to Class
3.       Set the Object to SysOperationServiceController
4.       Set the Parameters to <ServiceClassName>.<MethodName>
To call a Business Operation Framework service as a batch operation
To execute a batch operation:
static void Job2(Args _args)
{
    SimpleDataContract parameters = new SimpleDataContract();
    SimpleService service = new SimpleService();
    str returnValue;
   
    parameters.property1(99);
    parameters.property2('Hello World');
   
    returnValue = service.operation1(parameters);
    info(returnValue);
}
To call a Business Operation Framework service synchronously
To run the service synchronously, edit the menu item:
1.       Set the EnumTypeParameter to SysOperationExecutionMode
2.       Set the EnumParameter to Synchronous
After the service operation is complete, the result will be displayed in the InfoLog.
To call a Business Operation Framework service asynchronously
To run the service asynchronously, edit the menu item:
1.       Set the EnumTypeParameter to SysOperationExecutionMode
2.       Set the EnumParameter to Asynchronous
After the service operation is complete, the result will be displayed in the InfoLog.